5. Create your first project
Important
Ensure you have read Directory overview to understand what is going on under the hood.
Note
This section not only applies for one project, it applied for as many projects as you need. There is no limit in the number of projects.
Table of Contents
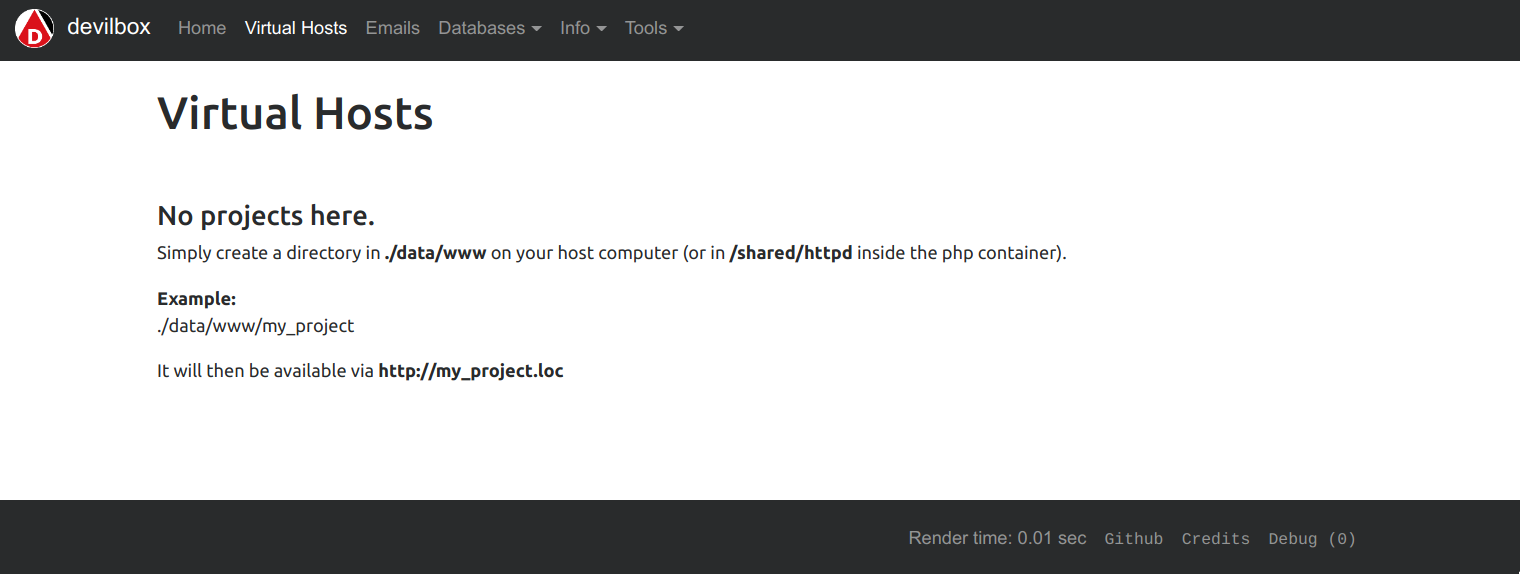
5.1. Step 1: visit Intranet vhost page
Before starting, have a look at the vhost page at http://localhost/vhosts.php
It should look like the screenshot below and will actually already provide the information needed to create a new project.
5.2. Step 2: create a project directory
In your Devilbox git directory, navigate to ./data/www and create a new directory.
Note
Choose the directory name wisely, as it will be part of the domain for that project.
For this example we will use project-1 as our project name.
# navigate to your Devilbox git directory
host> cd path/to devilbox

# navigate to the data directory
host> cd data/www

# create a new project directory named: project-1
host> mkdir project-1
Visit the vhost page again and see what has changed: http://localhost/vhosts.php
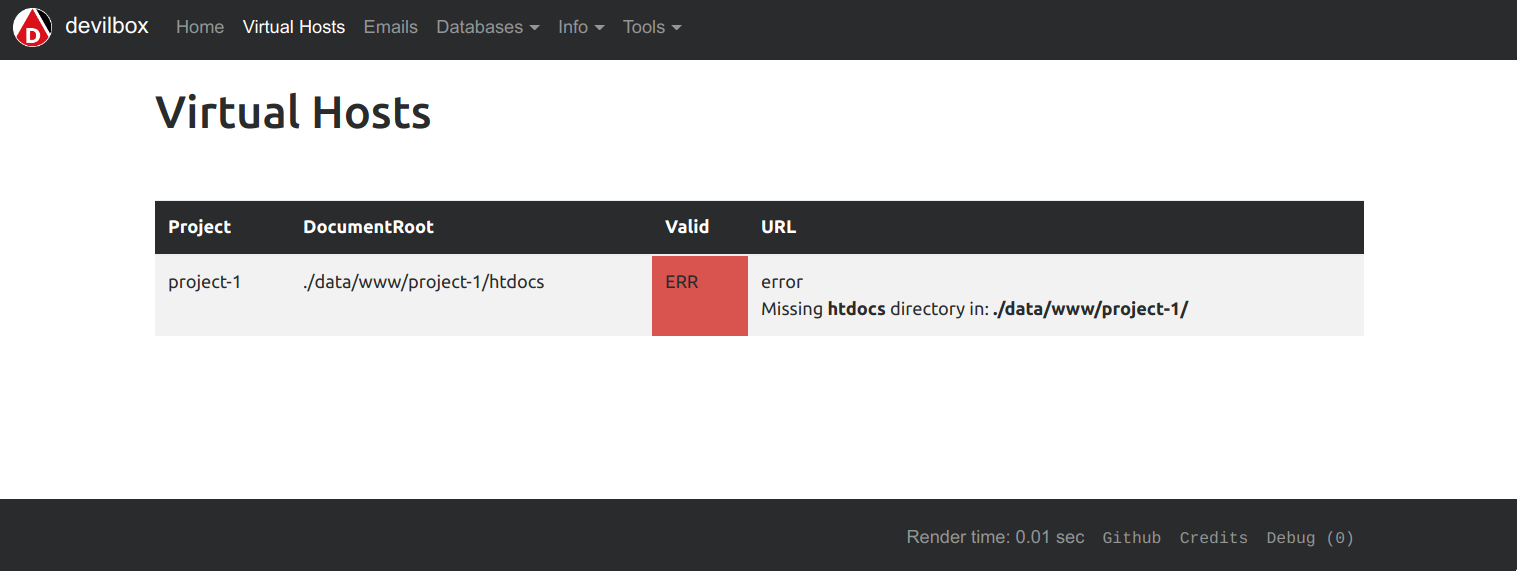
So what has happened?
By having created a project directory, the web server container has created a new virtual host. However it has noticed, that the actual document root directory does not yet exist and therefore it cannot serve any files yet.
5.3. Step 3: create a docroot directory
Note
As desribed in Docroot directory the docroot directory name must be htdocs for now.
Navigate to your newly created project directory and create a directory named htdocs inside it.
# navigate to your Devilbox git directory
host> cd path/to devilbox

# navigate to your above created project directory
host> cd data/www/project-1

# create the docroot directory
host> mkdir htdocs
Vist the vhost page again and see what has changed: http://localhost/vhosts.php
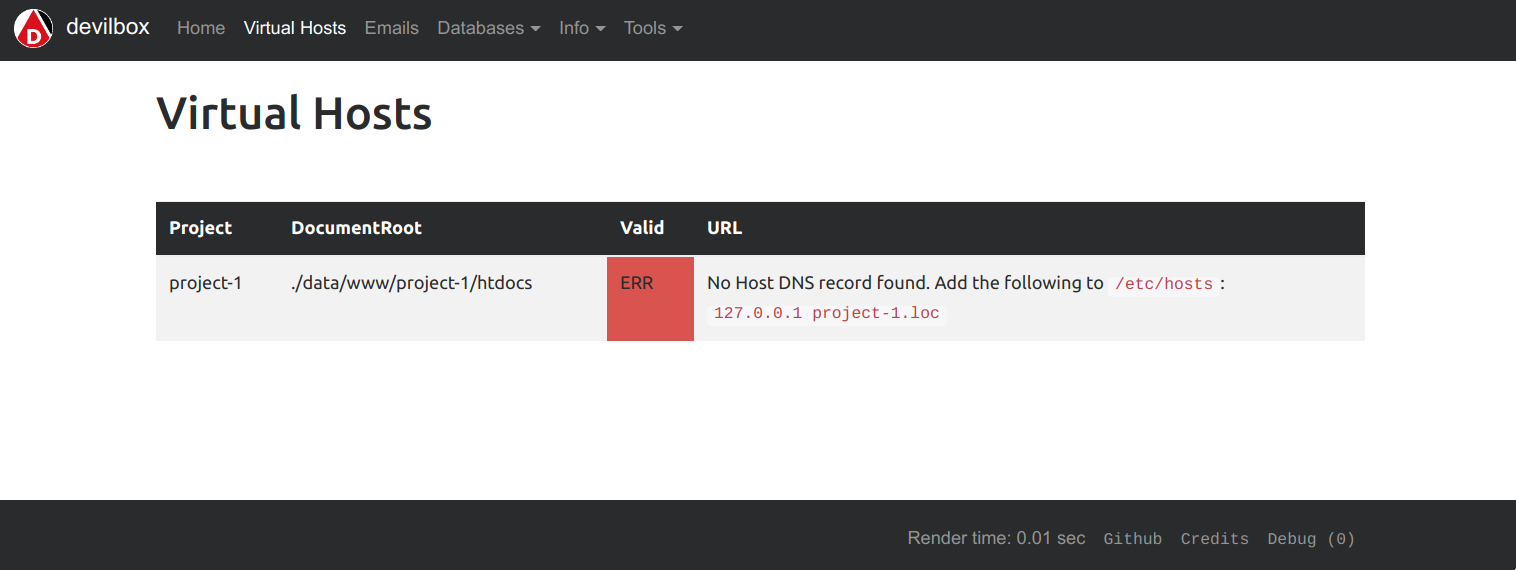
So what has happened?
By having created the docroot directory, the web server is now able to serve your files. However it has noticed, that you have no way yet, to actually visit your project url, as no DNS record for it exists yet.
The intranet already gives you the exact string that you can simply copy into your /etc/hosts file on your host operating system to solve this issue.
Important
This will only work on native Docker for Linux or MacOS. Read up on the next section to also find out how to do that on Docker Toolbox and Windows.
5.4. Step 4: create a DNS entry
Note
This step can also be automated via the bundled DNS server to automatically provide catch-all DNS entries to your host computer, but is outside the scope of this getting started tutorial.
5.4.1. Add DNS for Linux and MacOS (native Docker)
On Linux and MacOS (when using the native Docker), this step is fairly simple. The intranet provides
you the exact string you need to paste into your /etc/hosts file on your host operating system.
# Open your /etc/hosts file with sudo or root privileges
# and add the following DNS entry
host> sudo vi /etc/hosts

127.0.0.1 project-1.loc
5.4.2. Add DNS for Windows (native Docker)
On Windows (when using the native Docker), you can also copy paste the command provided by the intranet,
however the destination file is different. You have to add this string into: C:\Windows\System32\drivers\etc.
Open C:\Windows\System32\drivers\etc with admistrative privileges and add the following entry
127.0.0.1 project-1.loc
5.4.3. Add DNS for Docker Toolbox
When using Docker Toolbox the Devilbox runs inside a virtual machine and therefore the Webserver port (80)
is not exposed to your host operating system. So your DNS record must point to the virtual machine instead of your
host system.
- Find out the IP address the virtual machine is running on
- Add a DNS entry to your host operating system for this IP address.
For the sake of this example, let’s assume the virtual machine is running on 192.16.0.1, then the DNS record you will
have to add instead on your host operating system is:
Docker Toolbox on MacOS
host> sudo vi /etc/hosts

192.16.0.1 project-1.loc
Docker Toolbox on Windows
Open C:\Windows\System32\drivers\etc with admistrative privileges and add the following entry
192.16.0.1 project-1.loc
5.4.4. Back to intranet
Vist the vhost page again and see what has changed: http://localhost/vhosts.php
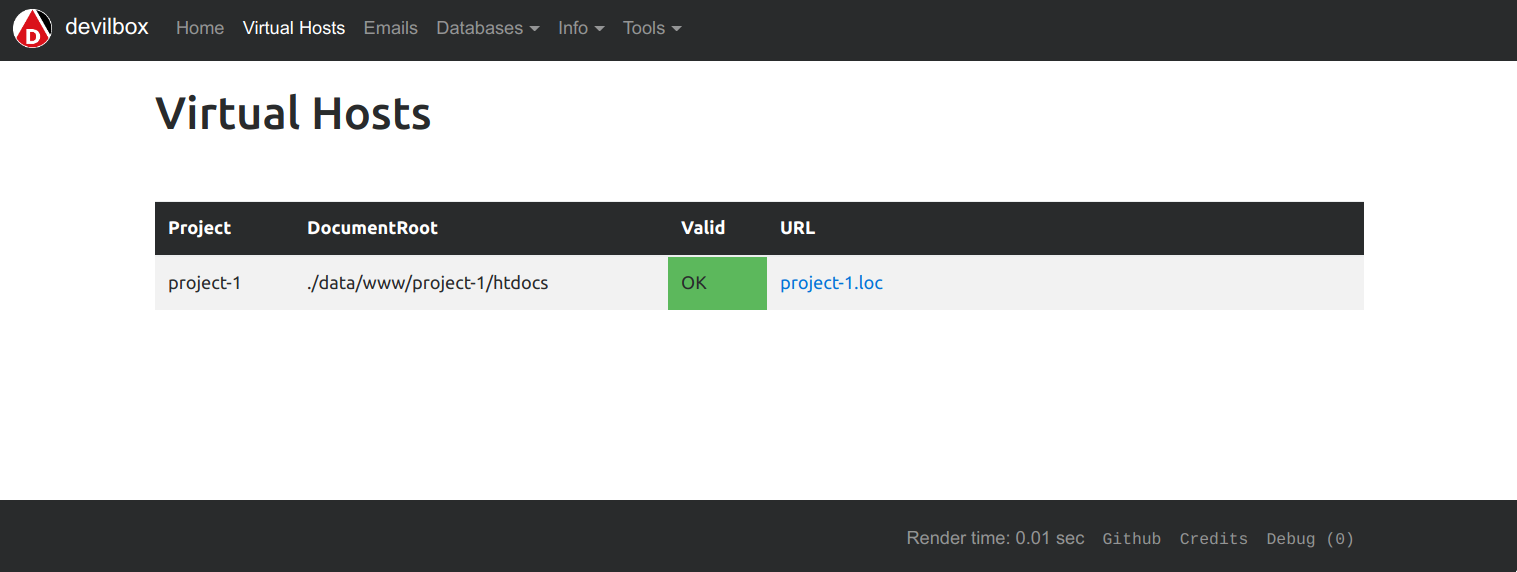
So what has happened?
By having created the DNS record, the Devilbox intranet is aware that everything is setup now and gives you a link to your new project.
5.5. Step 5: Visit your project
On the intranet, click on your project link. This will open your project in a new Browser tab or visit http://project-1.loc

So what has happened?
Everything is setup now, however the webserver is trying to find a index.php file in your document root which does not yet exist.
So all is left for you to do is to add your HTML or PHP files.
5.6. Step 6: Create a hello world
Navigate to your docroot directory within your project and create a index.php file with some output.
# navigate to your Devilbox git directory
host> cd path/to devilbox

# navigate to your projects docroot directory
host> cd data/www/project-1/htdocs

# Create a hello world index.php file
host> echo "<?php echo 'hello world';" > index.php
Alternatively create an index.php file in data/www/project-1/htdocs with the following contents:
<?php echo 'hello world';
Visit your project url again and see what has changed: http://project-1.loc

5.7. Checklist
- Project directory is created
- Docroot directory is created
- DNS entry is added to the host operating system
- PHP files are added to your docroot directory