DNS records
Project DNS records are required, because each project is using its own virtual host with its own unique server name.
The server name is constructed by a <project-directory> and the TLD_SUFFIX and
requires the same DNS record to be present in order to access it.
See also
This section gives you an overview about how to create separate DNS records for each project. It has to be done for each project, however if you want to automate the process, refer to Auto-DNS.
Table of Contents
Examples
In order to better illustrate the process, we are going to use two projects as an example. See the following table for project directories and TLD_SUFFIX.
| Project directory | TLD_SUFFIX | Project URL | Required DNS name |
|---|---|---|---|
| project-1 | loc |
http://project-1.loc | project-1.loc |
| www.project-1 | loc |
http://www.project-1.loc | www.project-1.loc |
Note
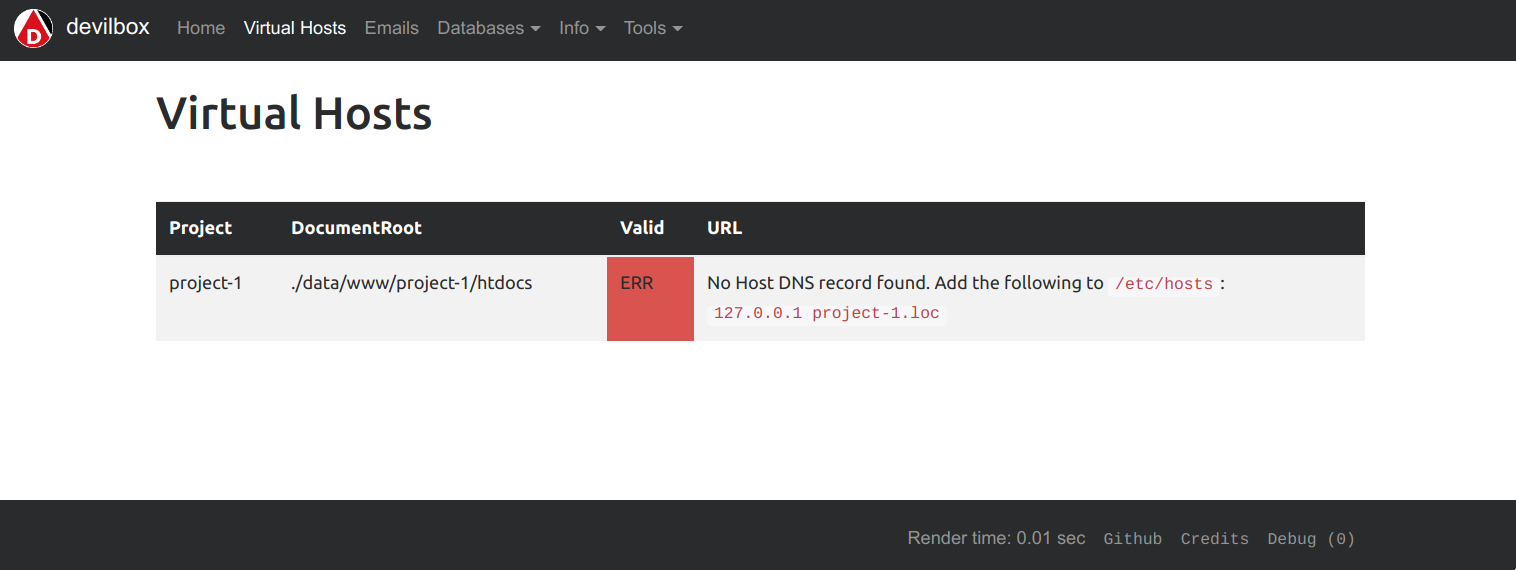
When you have created the above two projects, you can check the vhost page on the Devilbox intranet. It will tell you exactly what DNS record to add.
Important
The IP address 127.0.0.1 is different for Docker Toolbox
Creating DNS records
When creating DNS records for your host operating system, there are two distinctions to be made.
If you use Native Docker (the default and recommended Docker), you can always use 127.0.0.1
as your IP address for the DNS record. If however your use Docker Toolbox, you first need to
find out the IP address of the Docker Toolbox virtual machine.
See also
Native Docker
Linux
Use your favorite editor and open /etc/hosts with root privileges. The following example
uses vim to add the two example DNS records.
host> sudo vim /etc/hosts

127.0.0.1 project-1.loc
127.0.0.1 www.project-1.loc
Docker Toolbox
When using Docker Toolbox the Devilbox runs inside a virtual machine and therefore the webserver port (80) is not exposed to your host operating system. So your DNS record must point to the virtual machine instead of your host system.
- Find out the IP address the virtual machine is running on
- Add a DNS entry to your host operating system for this IP address.
For the sake of this example, let’s assume the virtual machine is running on 192.16.0.1
Verify
After settings the DNS records, you can use the ping command to verify if everything works.
host> ping -c1 project-1.loc

PING project-1.loc (127.0.0.1) 56(84) bytes of data.
64 bytes from localhost (127.0.0.1): icmp_seq=1 ttl=64 time=0.066 ms
host> ping -c1 www.project-1.loc

PING www.project-1.loc (127.0.0.1) 56(84) bytes of data.
64 bytes from localhost (127.0.0.1): icmp_seq=1 ttl=64 time=0.066 ms